Showing posts with label kitchen. Show all posts

Thursday, February 9, 2023

Reno's with Rosie - The Kitchen Contention - Part 2


When we left off after completing the first part of our kitchen renovation, life was good and there were no health issues on the horizon (as far as we knew). How things change in a year.

As you may know we’ve had a lot of challenges in 2022 and in spite of all that we finally completed the kitchen renovation in January of 2023.

When we paused the renovation, we still had a few things to do to complete the kitchen. We still had to paint the cabinet doors and switch them around so that the flat shaker style profile would be on the outside, then there was building the curved hood vent and installing cove moulding along the ceiling.

I am happy to report (so that your mind will be at ease) that everything on the list has now been completed, not only to my low standards but to the much higher standards of the foreman who goes by the name of Rose.

The range hood was the first item on the list that we tackled and I actually found that it was a fun challenge. I designed it in such a way that the curve developed into what we wanted as I put it together. Not having done anything remotely like it in the past, we needed to let it speak to us of the organic shape that felt most natural to it.

Just kidding, the foreman did most of the talking and she’s the one I was trying to please, not the range hood!

The finished Range Hood
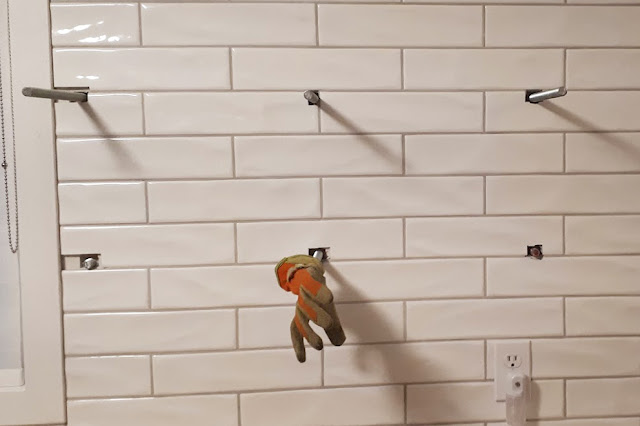

I built it around a fairly inexpensive white metal range hood that will easily drop out if it needs to be changed in the future and then I used 2” flexible wood slats that I bent into shape  and then I fastened a thin plywood skin over the top.

Working on getting the curve right

Lots of filling sanding and painting later, and it’s super smooth and looks great. Rose is still thinking she might want to do Venetian plaster over the top in the future but that’s up in the air for now.

The next step was the cabinet doors. We were fortunate to have the inside of the doors in a flat profile that is a more modern look and we were able to flip them over and install them with the old rounded profile on the inside where you don’t see it.

We used matching pulls from Ikea and I did a little tinkering with some cut up speaker wire behind the pulls to make them sit flat, trying to mount them on the rounded inside profile just didn’t work so after a little head scratching, voilà.

Attaching speaker cable behind the door pulls

Rose tackled the sanding of the cabinet doors because it was just after my heart attack and I was in no shape to do sanding and I just left her to it.

My lovely wife is more than a little gung ho sometimes and after a few days of her sanding, I took a look at the doors and found she had sanded them down to a nub, leaving the supposedly squared off edges more than a little rounded. Oh well, if the foreman did it, did it really happen?

I did a little magic with some wood filler and tape and we patched them up as much as we could and they look pretty good.

The real head scratching started when I began contemplating the cove moulding that we ordered from Wayfair after searching around Edmonton trying to find something locally.

We only had about 3” clearance above the Ikea Pax wardrobe cabinets that we had used and were unable to find anything suitable so we ordered these ones online. The name should have given it away, who knew Durofoam mouldings are made from foam? Actually they worked great, the only problem being figuring out how do you cut these things without ruining them? They are very soft and easily dented or scratched.

I tried a few things, watched a few YouTube videos and settled on a mitre box and a very long bread knife and that actually worked great. I took a little flak from Rose about using her good bread knife but I convinced her that if that thing can cope with the crust on her no-knead bread, it can handle a little foam moulding!

I took those moulding strips out and stared at them contemplating how I was going to go about it at least 4 times before I figured that I couldn’t avoid starting the job any longer and of course once I did start, it went pretty well. If you’ve ever cut crown or cove moulding before you may know what I’m talking about.

I would watch a video, make some notes, imagine it in my head, hold pieces up to the wall and think some more and then after all that I would end up cutting it wrong, AGAIN!

The only thing that worked for me on this particular inside corner was to cut some various short example pieces and hold them up to the corner and that eventually allowed me to get it right.

The famously difficult inside corner

Hopefully, I will never be called upon to do that again!

But I must say, after all of that work and expense, it looks great and I am very glad that I came up with the idea to renovate the kitchen in the first place. And with my amazing design eye, ingeniously creative carpentry skills, and decorating panache, the foreman seemed to be mightily pleased with me and said she might even keep me on, permanently!

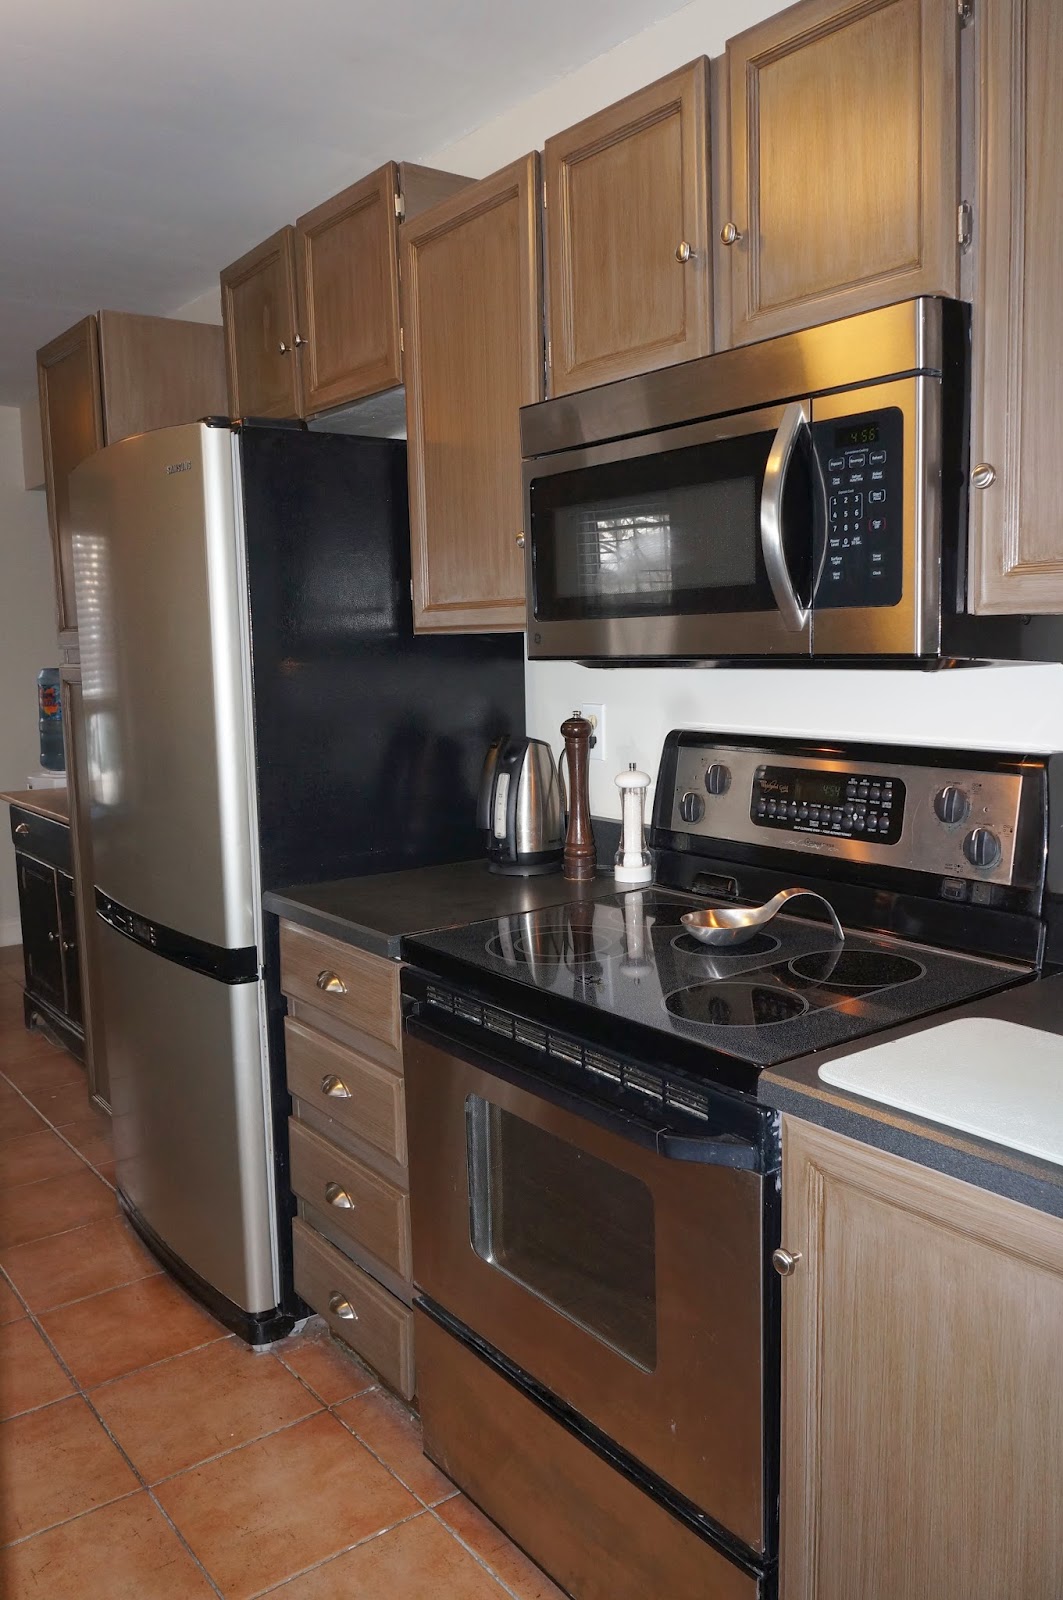
The finished kitchen - South wall

The finished kitchen

If you are wondering how much the whole project cost, we were all in at around $3200 plus of course around $20,000 in free labour, but it was fun (I keep telling myself) and there’s nothing like the sense of accomplishment that you get from doing something yourself, along with your partner/wife/foreman of course!

So that’s it, the last renovation project that I will ever tackle is now complete (I don’t believe that for a minute) and I am just going to relax and enjoy our beautiful new kitchen and all of the delicious food that comes out of it! 


Thursday, December 9, 2021

Renos with Rosie - The Kitchen Contention - Part 1


I protested vehemently and I argued eloquently. 

I even resorted to raising my voice and stomping my foot in protest. But in the end, somehow, through some kind of feminine wiles that I fail to understand, I agreed to renovate the kitchen.

Not that it didn't need it because oh boy, it realllllly needed it!

My argument was more along the lines of, "with the state of the world right now extra money might be better spent on a root/bomb cellar or any number of prepper supplies like maybe respirators or batteries and I don't know, copious amounts of toilet paper!"

When that didn't work I mentioned that I had spent the entire previous winter doing minor renovations of one sort or another and "I am just really exhausted! I'm supposed to be retired!" And finally, the real kicker argument, "I don't wanna!"

But as usual I was eventually overruled and after a lot of Pinterest consultations and discussion between Rose, our adult daughters, April, Kait and myself; our design began to take shape and plans were made.

Little did I know that Rose’s plans and what I thought were our plans did not jive at all! We were supposed to go to BC to visit her ailing father and other family and friends and as cabin season was coming to an end we were really busy there and in our own yard and there was definitely no time to begin renovations.

 So of course, that’s exactly what Rose proposed that we do, she wanted me to build a paint booth in the back yard and begin painting all of the kitchen cabinets before winter!

My usual knee-jerk (or just jerk if you prefer) reaction is to say “NO, it can’t be done! It’s impossible!” And of course that’s what happened, exactly as my clever wife had planned. Perhaps she knows me too well, or I don’t know her well enough because I fell for it again.

Once she had elicited my expected reaction to her outrageous painting proposal, she quickly backed away from the ruse and deftly slipped in a new more reasonable idea that I found infinitely more doable and so begins our kitchen renovation story.

If you've ever done much in the way of renovating,

you understand the domino effect that determines the

order in which you can proceed. For us it is the

extreme lack of storage space that we had to factor

into our plans as we thought about the order that

things had to be done.


This is where we are going


This is where we started

We decided that step one was to remove

our tiny pantry cabinet in the

kitchen and replace it with two Ikea

"Pax" wardrobe cabinets that we

could stuff full of all of the displaced

kitchen items that we would end up

with when we pulled down one of our

upper cabinets and did away with

all the countertop clutter.


These Pax things are huge and when you

install 3 drawers and 4 shelves

inside each one they are amazingly

spacious and practical as a kitchen

pantry.


One issue with them for us is the very

weak shelves that are only

supported on the sides and not the back.

But with my amazing MacGyver skills I

designed a hack that should make

these shelves able to survive unbowed

for years.


I cut 2x2 pieces to fit under the shelves

along the back, painted them white and

put screws into them through

the sides of the pantry. Mic drop!


Supports for the Pax Pantry shelves


Ikea "Pax" Pantry


Right now getting some products at Ikea is a challenge and it took over a month to get the shelves in and I ended up cutting down a full sized shelf to make a microwave shelf above our "coffee bar".


The coffee bar is our favourite part of the pantry setup right now with the little led strip mounted on the underside of the shelf above it illuminating the coffee area nicely. For once, everything related to coffee and tea is located together in one place! We love it.

The Coffee Bar


While we waited for the Ikea shelves to arrive we started on the countertops and removing one of the upper cabinets beside the window so we could tile the entire wall and install floating shelves.

We decided on rubber wood, butcher block countertops from Lowes and we picked up 3 of them on sale for $129 each. As I wheeled them out I was tempted to yell “start the car” like the Ikea commercial. Next I got started ripping out the old counters so we could get it all done while the weather held. Since I have no garage, I do most of my cutting outside and we were in a race against the winter snows.


Ripping out the old counter

The new counter installed


The weird hole I had to make for the sink

The countertops cut fairly easily and since we were butting them up against each other and not trying to do 45 degree angles or anything it went very quickly. The biggest job was cutting out the hole and fitting the used white cast iron sink that Rose had found at the Re-Store. 

After insisting that we store that old sink in the basement for at least 7 years, she finally found a use for the thing. It is a weird size that just barely fit into the existing sink base unit but now it looks great! 

Rose's salvage sink $30


As I got the counters all in and fastened down I was standing around admiring how great they looked and thinking, "there, that's done, on to the next step." Of course that's  when my lovely wife dropped the bombshell that she now wanted to get rid of the lazy Susan unit in the corner cabinet and replace it with some slide out pot racks.

I may have reacted shall we say "strongly",  since I had mentioned it earlier when the counters were off and was assured that no, we weren’t going to be ripping it out. “Are you sure dear?”  I asked, “because now would be the time to do it while the counters are off.”

But "nooooooo" I was told, until I was all finished installing the counters and then it magically changed to "YES", I should have known! 

As it turned out it wasn’t too difficult to take out with a little help from my favourite power tool, my sawzall, oh, oh, oh, oh, oh, that thing is amazing at demolishing stuff. 


Removing the Lazy Susan

The biggest problem was that once I cut a hole in the side of the cabinet and Junie our granddaughter learned she could climb inside and make a fort in there, I was lucky to get it done without breaking her little heart. She’s getting used to renovations though and seems to just roll with it, enjoying each phase of the process.

Junie in her temporary "fort"

Speaking of Junie, one day after we looked after her during the renovation and she was “helping me” all day she went home and was busy moving stuff around and when her mom asked her what she was doing her response was. “I'm the papa, making everything nice". She was apparently, “remodelling.” What a sweetie!

The pot rack drawers turned out great and after I was finished I noticed that there was about 6 extra inches of clearance so I made a nice little spice drawer as well. I’m particularly proud of the drawer as I made it for about $10 and it works great.


The new spice drawer

And the pot racks

Next we removed one of the upper cabinets, April helped me replace the kitchen window, (she now loves the Sawzall almost as much as I do) and we completely tiled the wall around the window right to the ceiling. 

Next I installed 2 floating shelves that I made myself from the same rubberwood countertops that I used for the counters and if that wasn’t enough, I boxed in the extra space above the cabinet so it goes right to the ceiling now.


April helps me tile the backsplash


It's coming along-holes are for the floating shelf pins

Rose likes to "inflict" I mean "show me" various blogs with ideas for doing some similar renos and sometimes they are even helpful. One of them was about installing floating shelves and since they seemed workable, I shamelessly used their ideas- with a little tweaking of course. 

Getting ready for the floating shelves

I drilled holes in the studs about 3 inches deep and threaded 5/8th rods into the holes and then drilled slightly larger, matching holes into the shelves and pushed the shelves on and just like that, floating shelves. Actually that all involved about 6 hours of work and cost more than commercially available shelves but hey, it’s “custom”. 

The partly finished kitchen

All that’s left to do on that wall is a little more tile, a crown molding along the top of the cabinets at the ceiling and to paint all of the kitchen cabinets. In part 2 of this little renovation blog we will be doing all of that plus building a new custom hood vent. That should be fun! Not!

So far it’s been going great and we both love the renos that we’ve completed. We are taking a much deserved Christmas break and then we get back at it in January. We’ve got a little bit of time before cabin season starts again in April and this year I’m determined not to miss a minute of it so this renovation has got to be done before then!


Monday, March 24, 2014

Renos With Rosie: This is Crazy!

A couple of weeks ago we took off for a ten day getaway to Hawaii, but as usual we did things just a little bit differently than perhaps I would like, or that might seem reasonable and sane.

Don't ask me how these things happen, I was just minding my own business, trying to keep out of trouble, (off of my wife's radar) and wham!

Our dream vacation to the lovely Hawaiian island of Maui was all booked, it should have been a nice relaxing week of packing and getting those last minute things looked after before our trip.

But how did we spend the week leading up to our flight early on a Saturday morning you ask?

We decided to refinish the kitchen cabinets! Crazy huh?

My lovely wife Rose had been dropping a few subtle hints about the far in the future (I assumed) upcoming project to refinish the cabinets. My early warning radar was apparently faulty though or I would have run for the hills at the first sign of trouble.

Rose had been talking about this miraculous "Transformations" kit that her friend Stacy uses when he renovates kitchens and she had actually already purchased a kit and set it out prominently on the counter for a few weeks. I think she uses the technique of slowly moving it around the house, placing it close to things that I like, a plate of cookies, my book, my microwave beany thing, so that I eventually loose my fear and don't react quite so strongly when she finally springs the trap.

It sounded reasonable, "we have all week, it's not hard, it will look soooooo good!"

I read the instructions, I watched the video, she talked it up how Stacy does it all the time and how it just transforms the whole room, what could go wrong?

What indeed?

If you've been following the Reno's with Rosie series you know that we are in the midst of a series of minor renovations around the house. Since the new year we have:

Repainted most of the house.
Scraped the old popcorn stipple off of the kitchen ceiling. 
(Popcorn and a movie)
Rebuilt an old table that has been in the family for a long time. 
(A table's tale)
Built a "Gallery Wall" for some of my photographs from Italy. 
(Creating the curator wall)
Started on re-tiling the fireplace hearth.
Removed part of the cabinets in the kitchen to open up the room.
And now, we've re-finished the kitchen cabinets. 

It's been a lot of fun and a lot of work and when I look into my crystal ball I see a lot more work on the horizon, a lot more!

Instead of telling you all about the process, (who's got that kind of time?) I will give you quick overview and post some pictures so you can see for yourself what we've been up to.

1. Empty out all of the cabinets and drawers.
2. Remove all cabinet doors, 20 doors plus 4 drawers and remove all hardware.
3. Clean and paint the interiors of all the cabinets.
4. Wash and "de-glaze" all of the cabinet doors and surfaces.
5. Prime all of the cabinet doors and surfaces.
6. Glaze all of the cabinet doors and surfaces.
7. Protector coat on all cabinet doors and surfaces, put it all together and blah, blah blah......
I'm bored writing all of this, it was a lot of work!

We worked every night all week until at least 10 or 11 o clock except Friday night, we finished in the afternoon, had some friends over that evening and finally packed after they left for the flight the next morning at 8:30 am.

We had some friends house-sit (cat sit is more like it) so of course there was all of the preparation for that as well, but we did have a pretty good time in Maui.

Everywhere we go we attract rain but on the plus side, the hills of Maui are much greener than they usually are this time of year! And, we saw lots of rainbows!

Before-during the removal of the "floating" cabinet, with the old paint colour.


2 drawers, one with base coat, one with glaze.


The old beige "distressed look" and the new, gross grey base coat.

Cabinets painted inside and waiting for the glaze and the topcoat etc.

Putting on the glaze (in my pajamas)

Finished: except for the floor and the baseboards and the.......


Nothing to it! Next project is probably the tile floor, I can't wait for that, NOT!
But who knows, maybe I won't have to do it if I keep my wits about me or maybe I'll find the pot of gold at the end of the rainbow, here's hoping.

Rainbow over Lahaina, Maui.


Click this link if you want to experience all of the fun and excitement of Cabinet "Transformations" for yourself.
http://cabinets.rustoleumtransformations.ca/

Update: No, I didn't manage to avoid tiling the floor, but the good news is that I think it turned out pretty good. Check it out below.


Thursday, January 23, 2014

Reno's With Rosie - Goodbye popcorn ceiling!

The day started out okay with a nice cup of coffee, reading a book, lounging around in my pj's, but.....little did I know.

After a while I heard the sound of busyness coming from the kitchen, a lot of busyness and not the pleasant baking or cooking sounds that foreshadow some kind of deliciousness eventually making it's way onto the table. These noises had a very different feel to them, a bit like that hollow feeling of anxiety (or outright terror) that the "dum dum, dum dum" sound from the movie "Jaws" produces.

The sound of furniture being dragged around produces a similar feeling in me and probably in many other husbands out there. I find myself thinking, "oh, oh, this is going to be expensive!" or "So much for relaxing!" or "I think I'll drive to Jasper for the day." I think it's time I started listening to that voice more carefully.


Back to this particular day - after a while Rose popped her head in and very kindly offered to make me a breakfast sandwich, "you better have breakfast, we're going to take the popcorn stipple off of the kitchen ceiling this morning."


"Huh?" was my clever reply. "Sure, I just watched a video on You-Tube about it and it looks really easy. (Curses to you, You-Tube, what did you have to go and do that for?)


"I left it on the computer, come and watch it." Rose called out, "I'll get things ready and we can do it together!" 

"OOOOHHHH, how fun." said my inner voice, my outside voice wisely said nothing.

But I could see the writing on the wall and actually I was excited about getting rid of the 35 year old gross, greasy, smelly popcorn stipple that should never have been sprayed onto any ceiling, let alone a kitchen!


So I surrendered gracefully and dutifully watched the video filled with some good but obvious suggestions: spray ceiling with water, but not too much! Wear a dust mask, put down a drop cloth, don't damage the ceiling, hold putty knife at 30 degree angle, catch scrapings in a paint tray, etc, etc. 


"Hey, it's not brain surgery buddy!"


4 hours later - it was all, "wow, that looks great, but I'm pooped!" It took a few tries and a little compromise to find a good system for us but we settled on this: Rose sprays the water and wipes excess off the walls, I climb up and scrape the ceiling emptying the tray into the bag that she holds for me and then I go and rest while she sprays the next section and so on.

The hanging cabinet is coming down.


The biggest conflict was trying to get her to wear a dust mask, it went something like this: Rose - "I (cough, cough) don't, (cough, cough) need one, this house is (cough, cough) only 35 years old, there's no asbestos!" Me - "you need to wear one, look, I'm wearing one, didn't you hear him in the video, there could be asbestos, at least keep out of the kitchen while I'm scraping!"


But eventually she found an old one and put it on, (the top of her head) but it finally found it's way down to her mouth and that made me happy, she looked so cute.


We ended up scraping about 20 pounds of stipple off of the ceiling and it really brightened up the room. Last week on my day off we took down a floating cabinet that hung right over the counter, blocking a lot of light and making it hard to properly make use of the counter top. That made a huge difference and really let the light in and made the kitchen look more open and modern. 


A few weeks ago we did the gallery wall in the living room and converted an old coffee table into a dining table, (see previous blog posts) and painted about half of the house. Rose also got a hold of an old leaning shelving unit at the Re-store that we mounted in the hallway and now holds some of our antique book collection and some old cameras of mine.


So all in all, the renovations and redecorating are coming along nicely.


Last week we were lucky enough to have a friend in the machine shop business make us a cool piece of decor from an old gear that came out of a big truck transmission and it looks great in the living room! It kind of matches the huge train station style clock that we mounted over the mantle. 


Another interesting, (and weird) bit of decor that we added recently is my dad's old collection of bowling pins and bowling balls, I would call them, "quirky but cool." My father Ron owned "Continental Engineered Bowling Supplies" way back in the sixties and we kept a few things from that era so it's fun to be able to display them now in a place of honor. 


Future projects: as soon as we can get a hold of a big enough tile cutter we've got a whole bunch of tiling to do on the hearth in the living room, the kitchen floor and the bathroom floor and the tub surround, so we have that to look forward to, "Yay, Not!"


But the truth is, it's kind of fun to get these things done and they're usually not as bad as my overactive imagination makes them out to be, thanks to my lovely, creative wife. 


But when she married me, little did she know......